
Leather goods are timeless—durable, elegant, and long-lasting. But daily wear, scuffs, and cracks can make even the best items look tired. This guide helps you bring them back to life with easy, budget-friendly DIY techniques.
Know Your Leather First
Understanding your leather type is key to proper care:
-
Full-grain leather: Most durable, ages beautifully with patina. Needs regular conditioning.
-
Top-grain leather: Slightly sanded, more uniform, still high quality. Condition periodically.
-
Genuine leather: Lower durability, needs more frequent maintenance.
-
Bonded leather: Least durable, prone to peeling. Handle gently.
Tip: Always check the label or ask the seller about leather type before applying any product.


Why Leather Maintenance Matters
Regular upkeep = longer life & better looks.
-
Prevents cracks, dryness, and fading
-
Keeps leather supple by replenishing natural oils
-
Enhances patina and long-term value
-
Protects against dirt, moisture, and wear
Common Leather Issues & How to Spot Them
-
Scratches/Scuffs: Often superficial; fixable with conditioner or repair kits.
-
Cracks: Caused by dryness; look for fine lines in high-stress areas.
-
Stains/Discoloration: From liquids, dyes, or sunlight; treat quickly.
-
Peeling (especially on bonded leather): Usually irreversible but can be slowed down.

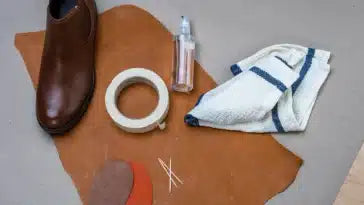
DIY Leather Repair Toolkit
Gather these essentials:
-
Leather cleaner & conditioner
-
Repair kit (color compound, applicator, filler)
-
Leather glue (flexible adhesive)
-
Sub-patch (for tears)
-
Soft cloths or sponges
-
Leather dye (for recoloring)
-
Seam roller (to flatten patches)
Quick-Fix: Repairing Scratches & Scuffs
Light marks? Try this:
-
Clean the area with leather cleaner.
-
Apply conditioner using a soft cloth.
-
Buff gently until the mark fades.
Deeper scratches?
-
Sand lightly (optional).
-
Use leather filler or compound from a repair kit.
-
Let dry & seal with leather finish.

Fixing Tears & Cracks (Step-by-Step)
-
Clean area thoroughly.
-
Apply glue to edges of the tear.
-
Insert sub-patch if needed.
-
Press & secure with masking tape or clamp.
-
Dry completely, then apply matching dye if needed.
-
Seal with a leather finisher.
Cleaning & Conditioning Tips
-
Clean gently with leather-safe cleaner every 2–3 months.
-
Always spot test products first.
-
Use circular motion to apply conditioner.
-
Let absorb, then buff to shine.
Pro tip: Never soak leather or use household cleaners—they can damage the surface.
Preventive Leather Care
-
Avoid direct sunlight, heat, and humidity.
-
Store in breathable covers (not plastic).
-
Keep items dry, and clean spills immediately.
-
Condition regularly to prevent cracks and dryness.
-
Don’t overload bags or overstretch items.
When to Call a Pro
Seek expert help if:
-
Damage is deep, widespread, or structural.
-
Item is high-value or sentimental.
-
You’re unsure about the leather type or repair method.
Conclusion: Keep Leather Looking Its Best
With just a little effort and the right approach, you can keep your leather goods looking polished, protected, and pristine for years.
Leave a comment
This site is protected by hCaptcha and the hCaptcha Privacy Policy and Terms of Service apply.